Elegant Sustainability: Crafting an Eco‑Friendly Wedding That Feels Effortless
Planning a wedding that radiates elegance while honoring the planet is a balancing act of heart and intention. Couples today…
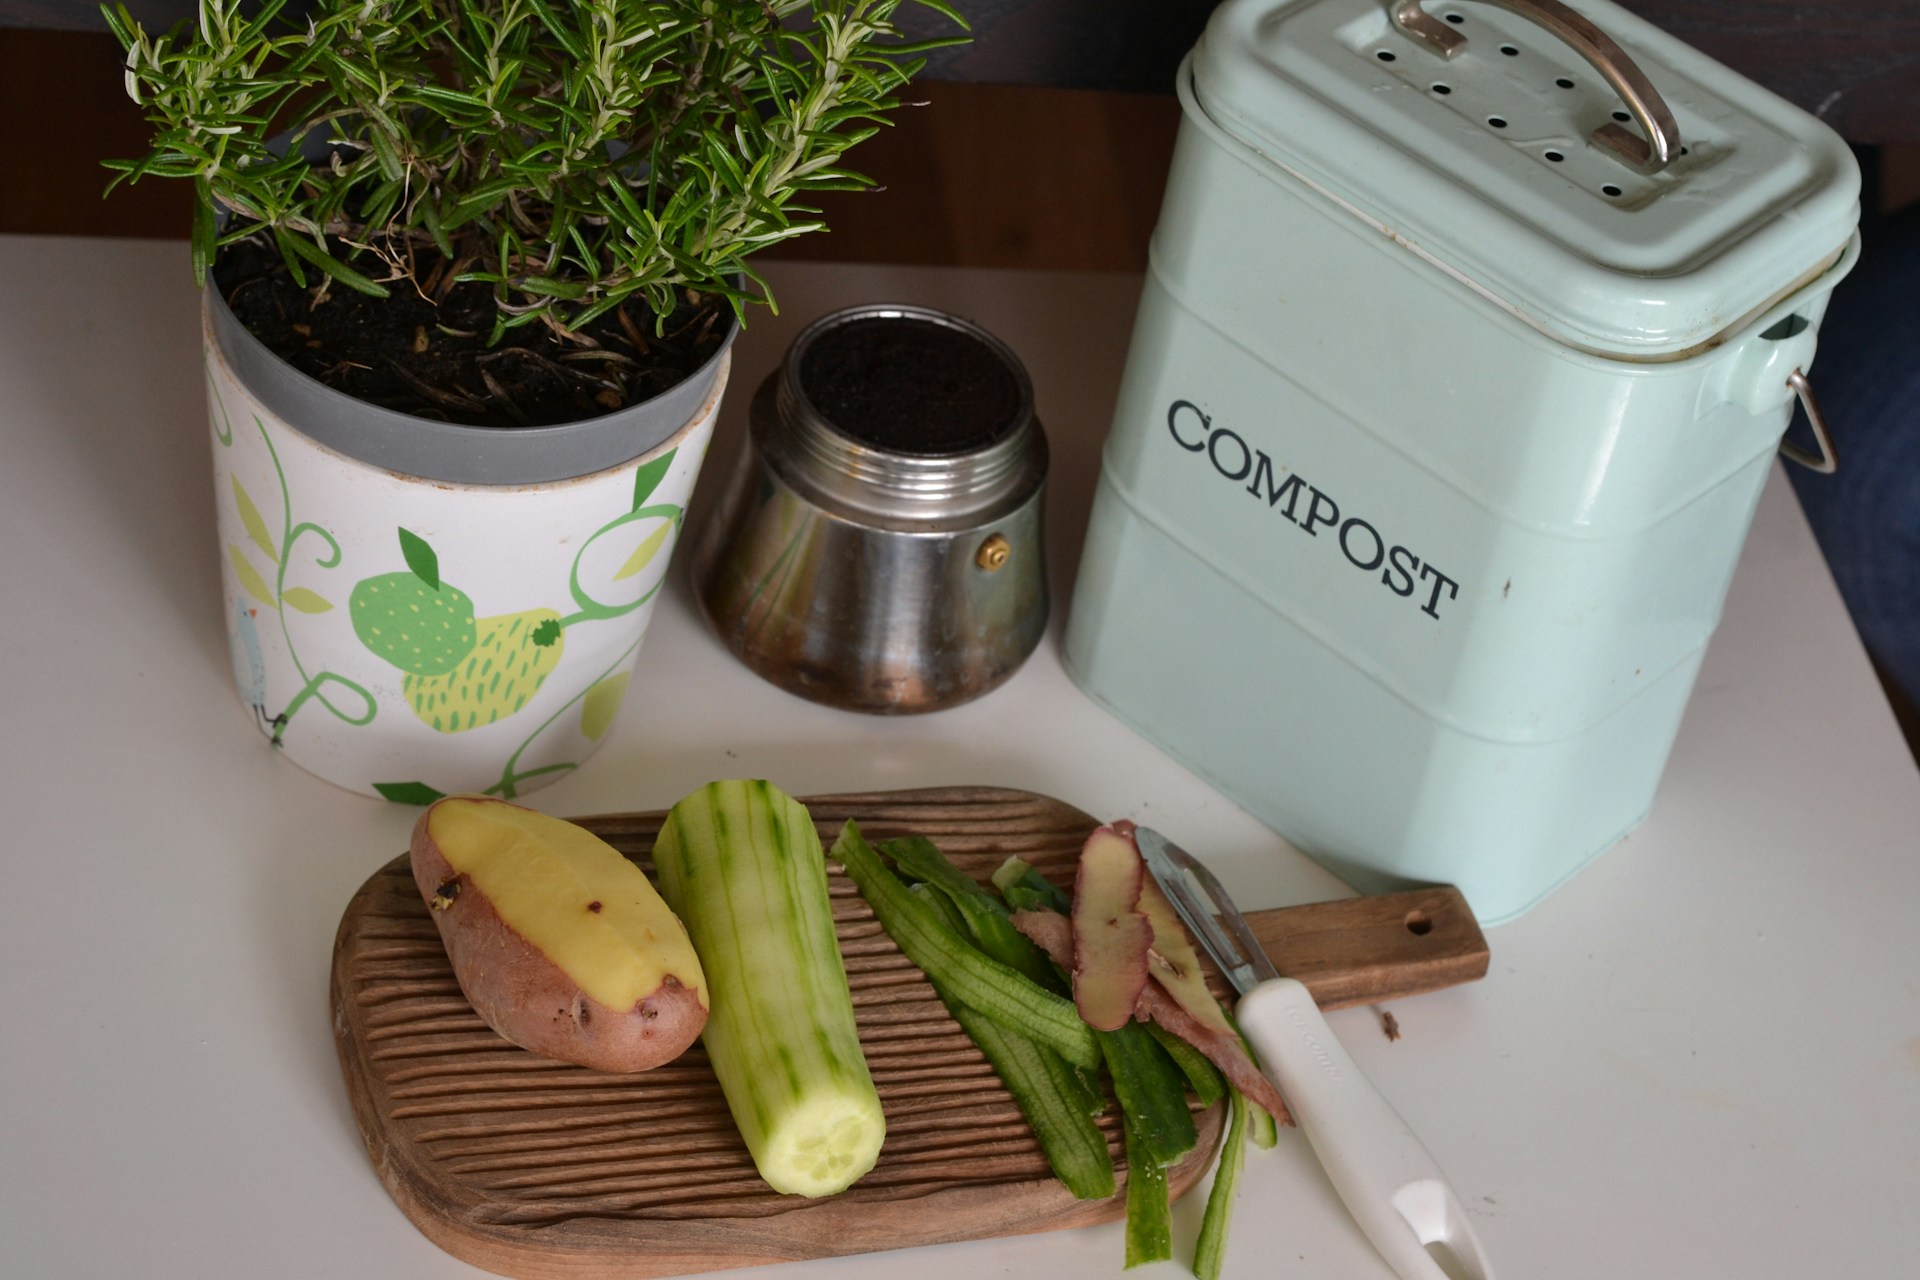 If you’ve ever looked at your banana peels, coffee grounds and wilting spinach and thought, “There has to be a better use for this,” you’re already halfway to becoming a composter. Composting decomposes food scraps and yard waste into nutrient-rich soil, and it doesn’t take a farm, fancy tools or hours of labor to get going.
You don’t need a backyard or even a bin, though these are great, too. Choose the method that works best for your space and effort level. You can use a:
Your compost needs a balance of greens, including wet, nitrogen-rich materials like grass cuttings and vegetable peels, and browns, featuring dry, carbon-rich materials like dried leaves and cardboard. You can decompose fruit, veggie scraps, coffee grounds and filters, eggshells, grass clippings, dry leaves, shredded paper or cardboard, and sawdust from untreated wood.
Avoid adding meat, dairy and oily foods — they’ll just stink up the place. Smelly compost also makes a perfect breeding ground for house and fruit flies, which can lay 500 eggs per day, with each egg maturing into another pesky fly in just a week.
Glossy or plastic-lined paper won’t decompose, so avoid these. Never add diseased plants or pet waste, which will cause moldy, non-nutritious soil. Don’t add chemically treated or synthetic materials that could affect the nutrient profile.
Look for products with packaging that’s part of the compostable products value chain so you can decompose items responsibly. Coffee manufacturers and roasters often provide their products in certified BPI bags, which makes for sensible composting. Keep your used grinds in the packaging, and when they’re full, add them to your heap and stir it well.
Start with a layer of shredded browns, then add some greens, followed by another layer of browns. Aim for a ratio of 25 parts brown to one part green, and then add sufficient water to wet the mix without making soup. If the pile gets too soggy, add more browns. You want consistency like a wet sponge, without water dripping if you squeeze the mix.
You can also add a few handfuls of soil to the mix to inject some helpful microbes.
Mix your compost every week or two to help airflow and speed up the process. The pile should retain that moist sponge texture, and it’s crucial to balance it in layers throughout the decomposition process. Remember, add brown if it’s too wet and green if it’s too dry or if sprinkling water doesn’t help the decay process.
Your compost should be ready in two to six months, depending on your method. You’ll know it’s done when it’s dark, crumbly and smells like fresh earth, without any rotten whiff. Use it as a free, organic fertilizer in garden beds, pots or around newly planted saplings and trees.
Starting can be overwhelming when you’re unprepared or try to compost everything. Luckily, troubleshooting is easy, and the solutions can be as simple as adjusting your mix.
If your bin smells rotten, you’ve gotten too many wet greens or added uncompostable items like yogurt, which won’t aid decomposition. Remove any nondecomposition-friendly items and add more browns like shredded newspaper, dry leaves or cardboard. Also, give the pile or bin a good mix or tumble so more air can get into it.
This is usually a problem with outdoor piles, and while it’s relatively harmless, it’s super annoying. Bury fresh scraps under browns and avoid leaving exposed fruit. A lid, tarp or covering can help.
Compost needs the right balance of air, moisture and materials. Check that you’re turning the pile, adding water if it’s dry, and balancing your browns and greens. Cold weather can slow the process, which is normal. In extremely hot weather, you may want to cover exposed heaps to prevent them from drying out too fast.
If animals are constantly digging through your piles, make sure you skip anything that could be a tasty edible for them, like bread, eggs and greasy food — which shouldn’t be in there anyway. Use a sealed bin or tumbler if pests are a big problem.
Beginners struggle to maintain that balance, but it’s all about frequent monitoring and adjusting. Don’t be afraid of grabbing a fistful for a quick squeeze test — like a wrung-out sponge.
These tips can help you make the best organic fertilizer ever:
Getting started with composting doesn’t have to be overwhelming. Focus on doing it simply and consistently, and you’ll soon have rich, usable fertilizer to show for it.